A Simple DIY for creating character-rich pieces on any budget
The right piece of art has the power to transform a room, but finding it isn’t always easy.
For years I searched for artwork that truly spoke to me. At flea markets, antique shops, and thrift stores, I would occasionally stumble across a piece that stopped me in my tracks: an oil painting with a storied past or a still life that felt perfectly timeless. More often than not, though, the price tag placed it far out of reach.
That search eventually led me to the world of public domain art, where works no longer under copyright are digitized by museums and archives and made freely available in high resolution files that anyone can download, print, and enjoy. Suddenly, I had access to an extraordinary collection of art, spanning everything from landscapes to still lifes and portraits, each with the character and charm I had been hoping to find.
By printing these public domain works on canvas and pairing them with thrifted frames (readily available in abundance at secondhand shops), I discovered a way to recreate the look of antique artwork for a fraction of the cost, without sacrificing style. frames and public domain prints.
Here’s how you can create your own elevated canvas art using thrifted frames and public domain prints.
DID YOU KNOW? Many museums digitize their collections at ultra-high resolution—allowing you to see more detail than the naked eye could in person.
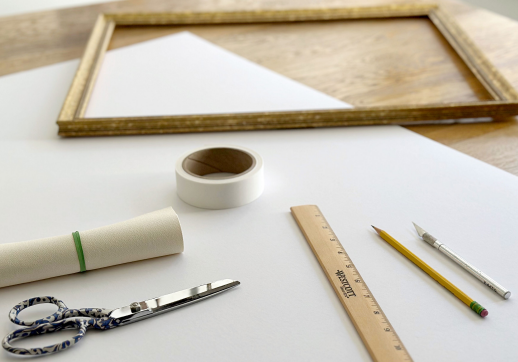
MATERIALS
Everything you’ll need before you start
- Rolled canvas print with 2” border (or heavy-weight canvas/watercolor paper print)
- Thrifted frame
- Matte board or sturdy backing board
- Xacto knife or scissors
- Ruler or straightedge
- Pencil
- Double-sided tape or acid-free tape
Step 1: Choose Your Artwork
Search open-access museum or archive collections for high-resolution files (300 dpi or larger recommended) so your print looks crisp. Many collections are freely available, including:
- The Metropolitan Museum of Art’s Open Access Collection
- The National Gallery of Art in Washington, D.C
- The Rijksmuseum in Amsterdam
- Wikimedia Commons
Once you’ve found a piece, have it printed on rolled canvas through an online photo lab or local print shop (many are surprisingly affordable). You can also try heavyweight watercolor paper or canvas-style printer paper if printing at home. For best results, add a 2” border around the image to make wrapping and mounting easier.
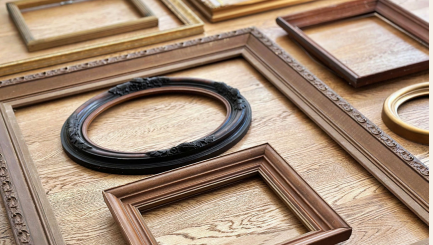
Step 2: Prepare Your Frame
Choose a thrifted or vintage frame that speaks to you. Remove the glass and old backing, and give it a quick clean. Don’t worry if the finish isn’t perfect. A little patina adds charm, or you can refresh it with paint or Rub ’n Buff (a metallic wax finish that’s brushed on to add warmth or shine).
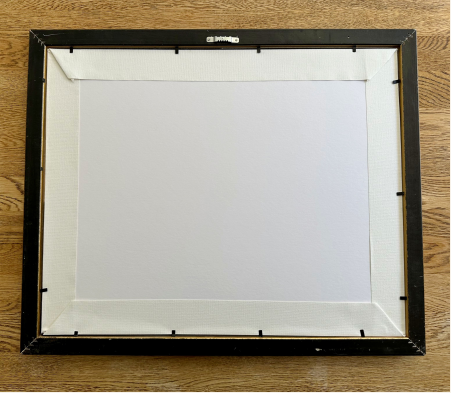
Step 3: Mount the Print
Cut a piece of matte board to size using a straight edge and razor. Wrap the print around the board, securing it neatly with double-sided or acid-free tape. If you’re working with an oval or round frame, trim carefully to avoid extra overhang.
Step 4: Assemble the Frame
Place the mounted print into your frame and secure it with flexible frame tabs (available at most craft or hardware stores). If your frame already has tabs, simply bend them back down to hold the backing in place.
PRO TIP: I like to use a point driver to insert new flexible tabs, it’s a framing tool that gives a clean, professional finish. But bending existing tabs or adding new ones by hand works just as well.
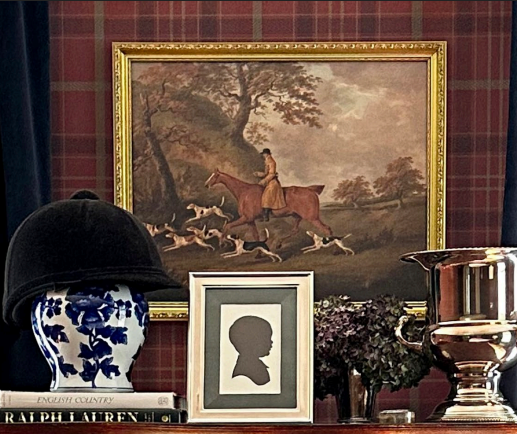
Step 5: Style and Display
Flip it over and admire your new artwork. Hang it on the wall, or lean it on a shelf or mantel for a collected, cottage-style look.
Bringing it home:
Beautiful art doesn’t need a big budget. With a little creativity and a secondhand frame, you can bring history, beauty, and character into your home in a way that feels personal and collected.
OPTIONAL VARIATIONS:
- Refresh the frame with paint or rub-n-buff.
- Try watercolor paper for a softer effect.
- Use Mod Podge with a small artist’s brush to add subtle texture over the print, mimicking brushstrokes of an original painting.
- Mix and match frames for a collected, gallery feel.