Toni Mogensen is one of three finalists in our 2021 Brand Ambassador search. Today, we’re featuring her DIY tutorial for a pumpkin-shaped bowl made of concrete. Read, enjoy and come back again to see DIYs from our other finalists, Katie Baker and Sara McDaniel.
I love fall, I love pumpkins and I love flowers so what better way to kick off the season than to create a fabulous cement pumpkin bowl. The bowl can be used as a vessel for fall foliage, flowers or other items to celebrate the season. In this simple DIY, I will show you how to create a centerpiece that is inexpensive, show stopping and that you can make with just a few supplies and minimal time and effort. I only wish it smelled like pumpkin spice!
Supplies and Tools:
- Hollow pumpkin mold (can be plastic, metal or resin)
- Quick setting cement such as All-Crete
- Small plastic cup, bowl or bucket
- Water
- Lubricant like silicone or cooking oil
- Masking tape
- 5-gallon bucket
- Corded drill with mixing attachment or mixing spoon
- Scissors, tin snips or grinder
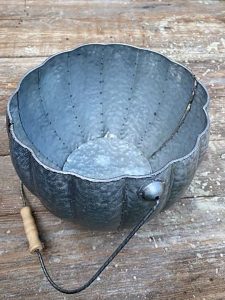
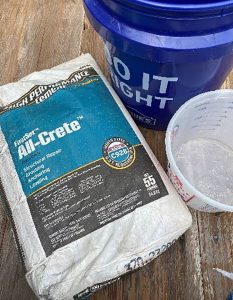
DIY Cement Pumpkin Tutorial:
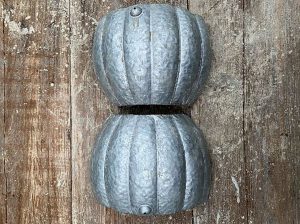
Step 1: Cut pumpkin mold in half.
The first step is to cut your pumpkin mold into two equal pieces, vertically from top to bottom. If you are using a thin plastic pumpkin you should be able to cut it with scissors or shears. If your pumpkin is metal or resin, you will most like need a grinder with a cutoff wheel. This will enable you to remove the mold easily when the cement has cured as the top of the mold is narrower than the middle, unlike a mold such as a bucket or bowl with an opening the same size or larger than the middle.
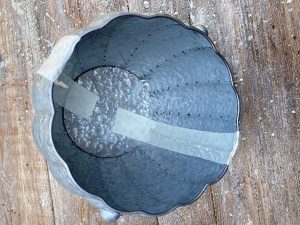
Step 2: Tape pumpkin back together.
You will now need to tape the pumpkin back together, taking care to align the cut edges. Tear off a length of masking tape to cover the edges and while holding the pumpkin together, place the tape over the cut seam on the outside. In addition, if you are using a large mold you can encircle the pumpkin with rope, wire or more tape.
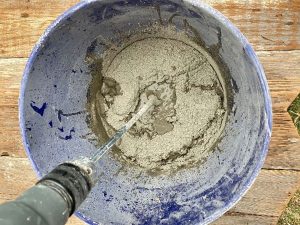
Step 3: Mix cement.
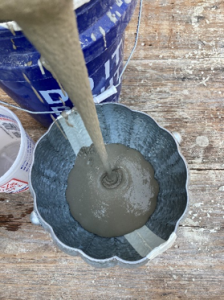
Estimate the amount of dry concrete you will need to fill the pumpkin approximately two-thirds up the side of the pumpkin. Mix according to directions on the bag, adding water first to your mixing bucket and then the cement. Add more water or cement to reach a cake batter consistency. A corded drill with cement mixing attachment will make it easier to achieve a smooth consistency free from lumps.
Step 4: Pour cement into mold.
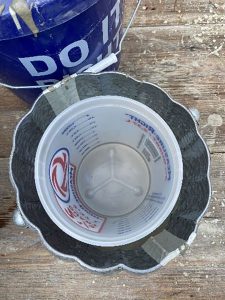
Spray the inside of your mold and the vessel you will place in the wet cement to make the hole with which you will use for the “vase,” with lubricant such as silicone or cooking oil. Pour the cement into the mold until two-thirds full, place the interior vessel into the cement and push down until only one inch is above the lip of the pumpkin mold. Add or remove cement to bring it level with the top of the mold.
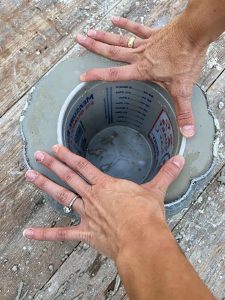
Hold interior vessel in place until cement reaches a firm plastic stage and begins to heat up. Release the interior vessel when it no longer moves. The cement will begin to harden from the bottom of the mold and will “grab” the bottom of the interior vessel.
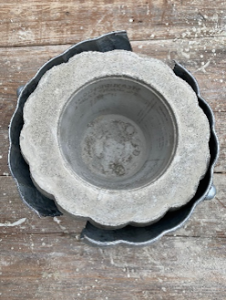
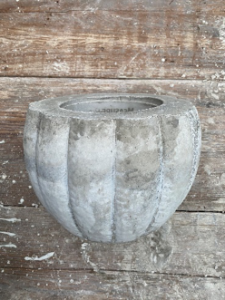
Step 5: Let cement fully cure and remove pumpkin mold.
Cement cures by chemical reaction and will heat up. Quick drying cement has an additive that speeds the curing process even more. During this time, you will notice the outside of the mold becomes very hot, well over 100 degrees Fahrenheit. It is not hot enough to burn you but will create enough heat that you cannot keep your hand on the mold for very long.
Once the heat dissipates and you can no longer scratch the top surface of the cement your mold will be ready to be removed. Remove the outer tape and gently pry the pumpkin mold apart. You can then remove the interior vessel as well.
*Pro Tip: Condensation from steam will form between the mold and cement from the heat and water, aiding in mold removal. Do not remove mold or interior vessel until the cement starts to cool down and condensation is formed.

Step 6: Decorate.
Your cement pumpkin is now complete and ready to decorate with! If you will be using cut flowers, place a vase or jar inside the hole to hold the water. Hardened cement is porous and while water will not damage the cement, it will pass through it and leave water marks on your furniture. You can also paint your cement pumpkin if you do not like the natural gray cement color.
Toni shares all her lovely home decor ideas and DIY projects on Instagram as @toni_marianna.
Want more Halloween porch decor ideas? Check out this post on Halloween porch DIYs.
Of course, don’t forget to follow us on Instagram, Facebook and Pinterest to get your daily dose of cottage inspiration!

